Introduction: How to Make a Nightmare Before Christmas Cake
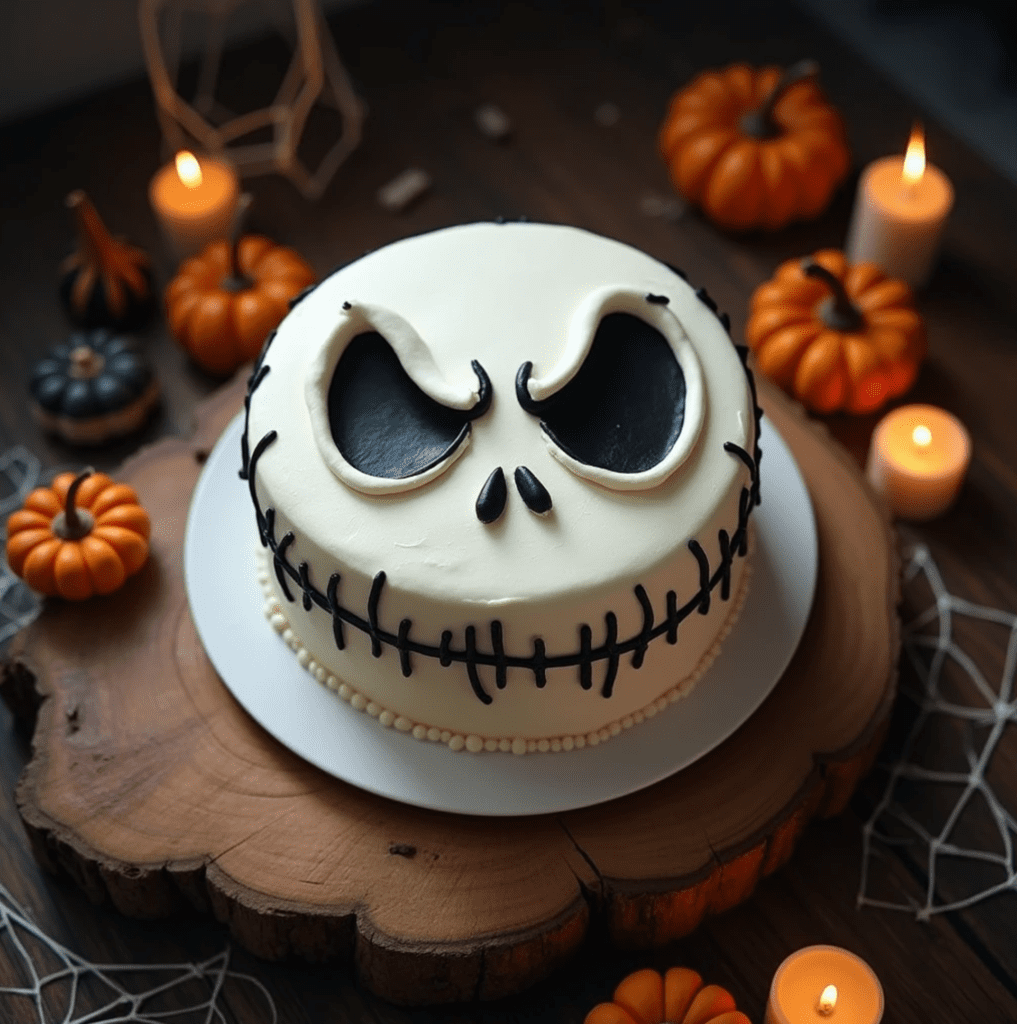
Creating a themed cake can turn any occasion into a magical experience, and what better way to celebrate Halloween, Christmas, or a movie night than with a Nightmare Before Christmas cake? In fact, this guide will walk you through every step, from baking to decorating, while offering creative variations and expert tips. Not only that, whether you’re an experienced baker or a beginner, you’ll discover how to make a Nightmare Before Christmas cake that wows your guests and captures the iconic charm of Tim Burton’s beloved masterpiece.
Above all, by the end of this guide, you’ll not only know the steps to bake and decorate your cake but also learn answers to common questions and creative twists for a unique dessert.
Why a Nightmare Before Christmas Cake?
Tim Burton’s The Nightmare Before Christmas is a timeless classic that bridges the gap between Halloween and Christmas. Moreover, its quirky and eerie aesthetic makes it the perfect inspiration for a themed cake. Not only that, but the movie has an enduring appeal across generations, loved by children and adults alike for its imaginative story and captivating visuals. Its blend of spooky charm and whimsical fun creates a unique theme that stands out at any event.
From Jack Skellington’s iconic face, which is instantly recognizable, to the whimsical, spooky town of Halloween Town, this cake allows you to showcase creativity while impressing friends and family. In addition, a Nightmare Before Christmas cake can be customized to match a variety of occasions, from Halloween parties to Christmas celebrations, movie nights, or even themed birthdays. Because of its versatility, it’s an excellent choice for bakers who want to explore both spooky and festive decorations.
Above all, creating this themed cake gives you the opportunity to combine artistry with delicious flavors. Whether you recreate Jack’s grinning face, add elements of Halloween Town, or experiment with creative twists like Oogie Boogie or Sally-inspired designs, the options are endless. For example, you can choose bold and spooky black-and-white colors or add pops of vibrant purple, green, and orange for a Halloween flair. As a result, this cake will undoubtedly become the centerpiece of your celebration, drawing compliments and inspiring conversation.
In short, making a Nightmare Before Christmas cake is more than just baking—it’s about bringing a beloved story to life in edible form. The combination of creative design, delicious taste, and nostalgic charm makes it a memorable and delightful project for bakers of all skill levels.
Ingredients for Your Nightmare Before Christmas Cake
Before you get started, gather all the ingredients for both the cake and the decoration.
For the Cake (Chocolate or Vanilla Base)
- 2 ½ cups all-purpose flour
- 2 cups granulated sugar
- 1 cup unsalted butter (softened)
- 1 cup milk
- 4 eggs
- 2 teaspoons baking powder
- 1 teaspoon vanilla extract
- ½ teaspoon salt
- Optional: ½ cup cocoa powder (for a chocolate version)
For the Frosting
- 2 cups unsalted butter (softened)
- 4 cups powdered sugar
- 2 teaspoons vanilla extract
- 2-3 tablespoons milk (adjust for consistency)
- Black food coloring
- White food coloring
For Decorations
- Black fondant (for Jack Skellington details)
- White fondant (for base decorations)
- Piping gel or edible glue
- Food-safe brushes
- Edible glitter (optional for shimmer)
- Cake turntable (recommended for smooth frosting)
- Various piping tips (round and star tips)
Step-by-Step Instructions: How to Make a Nightmare Before Christmas Cake
Follow these steps to create the perfect cake. In addition, remember to chill the cake at key stages to ensure smooth decorating.
1.Bake the Cake Layers for Your Nightmare Before Christmas Cake
- Preheat your oven to 350°F (175°C). Grease and line three 8-inch round cake pans with parchment paper.
- Mix dry ingredients: In a large bowl, sift the flour, baking powder, and salt. For example, if you want a chocolate cake, add cocoa powder.
- Cream butter and sugar: Using a stand mixer, cream the butter and sugar until light and fluffy (about 3-4 minutes).
- Add eggs and vanilla: Beat in the eggs, one at a time, followed by the vanilla extract. In fact, this step ensures a smooth and airy batter.
- Combine and mix: Gradually add the dry ingredients, alternating with milk. Mix until smooth.
- Bake: Divide the batter evenly between the cake pans. Bake for 25-30 minutes or until a toothpick inserted comes out clean.
- Cool: Let the cakes cool in the pans for 10 minutes before transferring to a wire rack to cool completely. Moreover, cooling the cake properly prevents frosting issues later.
2. Prepare the Frosting for Your Nightmare Before Christmas Cake
- Beat the butter: In a large bowl, beat the softened butter until creamy.
- Add sugar gradually: Slowly add the powdered sugar, 1 cup at a time, mixing until smooth. On the other hand, too much sugar at once can make the frosting lumpy.
- Flavor and adjust: Add vanilla extract and milk as needed for a spreadable consistency.
- Color the frosting: Divide the frosting into two portions. Tint one portion black and leave the other white. For instance, gel food coloring works best for achieving vibrant shades.
3. Assemble Your Nightmare Before Christmas Cake
- Level the cakes: Use a serrated knife to trim the tops of the cakes for even layers. In addition, a level cake ensures professional-looking results.
- Layer the cake: Place the first cake layer on a cake board. Spread a thin layer of white frosting evenly. Add the next layer and repeat.
- Crumb coat: Apply a thin layer of frosting over the entire cake to lock in crumbs. Chill the cake for 20 minutes. As a result, decorating becomes much easier.
- Final coat: Use the remaining white frosting to create a smooth base layer. Moreover, a cake scraper will help achieve clean edges.
4. Decorate Your Nightmare Before Christmas Cake
Now comes the fun part: turning your cake into a Nightmare Before Christmas masterpiece!
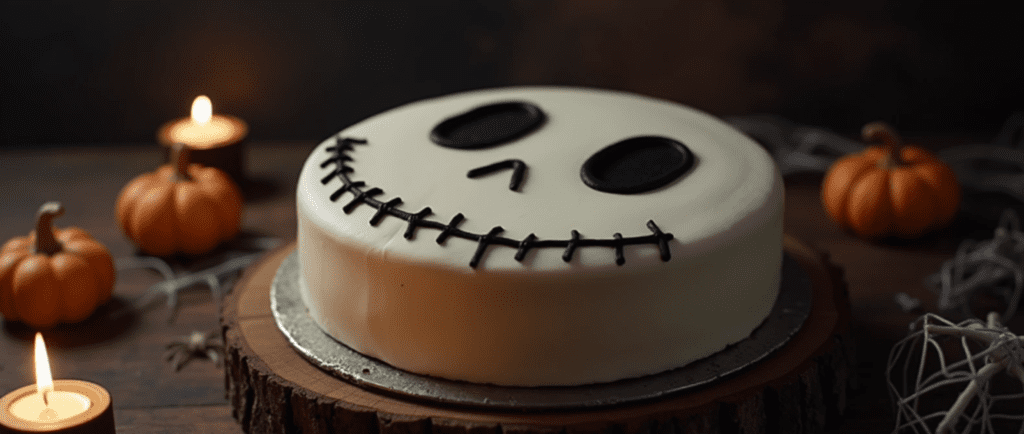
Create Jack Skellington’s Face
- Roll out black fondant on a clean, powdered surface. For example, sprinkle cornstarch to prevent sticking.
- Cut out large oval shapes for the eyes and small pieces for the nose.
- Create Jack’s signature smile by cutting out a curved line with vertical lines for the stitches. In fact, this detail brings Jack Skellington to life.
- Carefully place the fondant pieces onto the frosted cake using edible glue.
Add Halloween Town Elements
- Moon and Hill: Create a yellow fondant circle for the moon and a black swirl for the famous hill. Moreover, these elements add a whimsical touch.
- Tombstones and Trees: Sculpt small tombstones and spooky trees using black fondant.
- Shimmer and Glitter: Brush edible glitter onto the decorations for a magical effect. In short, these finishing touches elevate the design.
Creative Variations for Your Nightmare Before Christmas Cake
- Cupcake Version: Make Nightmare Before Christmas-themed cupcakes with Jack Skellington faces on top.
- Oogie Boogie Cake: Use green frosting and fondant to replicate Oogie Boogie’s character.
- 3D Cake: Stack layers to create a 3D Jack Skellington head for a wow factor.
- Colorful Twist: Add purple and orange accents for a vibrant Halloween vibe. In addition, colorful themes work well for kids’ parties.
Tips for Success
- Use Gel Food Coloring: It gives a vibrant color without changing the frosting’s consistency. On the other hand, liquid coloring can thin the frosting.
- Chill Between Steps: Keep your cake chilled during frosting and decorating for cleaner results.
- Plan Ahead: Bake the cake layers the day before to save time. Consequently, decorating becomes less stressful.
- Fondant Tools: Invest in basic fondant tools for precise details. In conclusion, the right tools make all the difference.
Frequently Asked Questions
How is The Nightmare Before Christmas made?
The movie is a stop-motion animated film, where each frame is individually shot. Puppets and miniature sets were used to bring the story to life. Moreover, it took years to complete. To learn more about The Nightmare Before Christmas and related content, click here.
How far in advance can I make a Christmas cake?
You can bake the cake 2-3 days in advance. In addition, store it in an airtight container in the fridge to keep it fresh. If you want to discover more about making a festive Nightmare Before Christmas cake, click here.
How do you get The Nightmare Before Christmas?
The movie is available on streaming platforms like Disney+ or for purchase on DVD/Blu-ray. If you’re wondering where to buy a themed cake inspired by the movie, click here.
How to make a cake in Minecraft 1.8.8?
In Minecraft, you need 3 wheat, 3 milk buckets, 2 sugar, and 1 egg to craft a cake. Similarly, the recipe works across various versions of the game. For a real-life Nightmare Before Christmas cake recipe, click here.
What does The Nightmare Before Christmas Sally perfume smell like?
The Sally perfume is inspired by the iconic character and has a unique scent that combines floral, earthy, and soft notes. To discover more about the Nightmare Before Christmas themed items, click here.
Conclusion
Now you know how to make a Nightmare Before Christmas cake that’s sure to impress! Moreover, whether it’s for Halloween, Christmas, or a themed party, this cake brings the beloved movie to life with delicious results. Use our step-by-step guide, creative variations, and helpful tips to create a show-stopping dessert that captures the spooky charm of Jack Skellington and Halloween Town.
Chocolate Guinness Cake with Baileys Buttercream
Ultimate Dolly Parton Butterscotch Pie: 5 Sweet Reasons to Try This Classic Dessert
5-Minute Sausage Egg and Cheese Breakfast Roll-Ups: The Perfect Morning Delight
Healthy Avocado Grilled Cheese: 5 Reasons to Try This Nutritious Twist on a Classic

7 Reasons to Love Smothered Potatoes: A Delicious and Nutritious Comfort Food
Greek Yogurt Chia Pudding: 5 Reasons This Simple, Healthy Treat is a Game-Changer

