Introduction to the Nightmare Before Christmas Cake
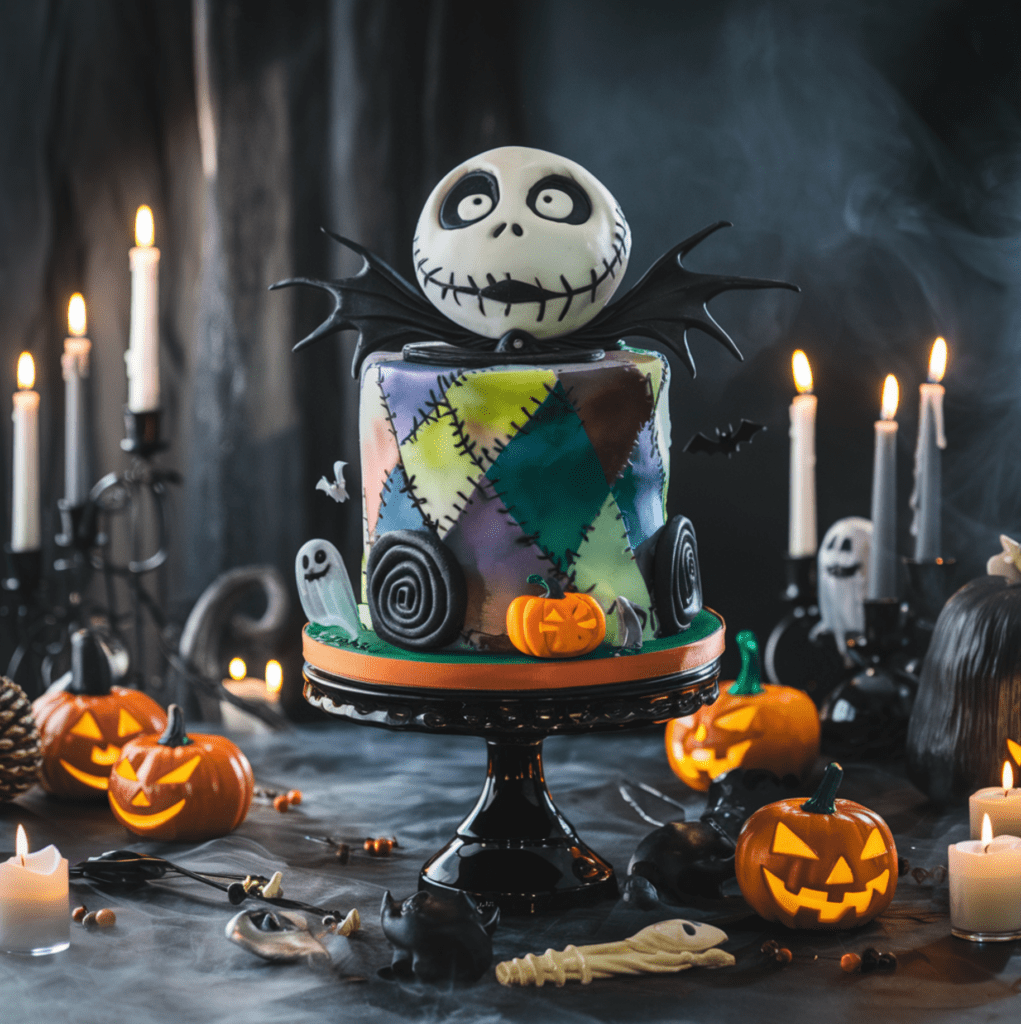
Tim Burton’s The Nightmare Before Christmas has become a beloved classic for fans of all ages. Not only that, whether you’re team Halloween or team Christmas, this movie brings together spooky charm and festive cheer. What better way to celebrate than with a Nightmare Before Christmas cake inspired by Jack Skellington, Sally, and the eerie wonder of Halloween Town?
Creating a Nightmare Before Christmas cake might sound challenging; however, with the right steps and a sprinkle of creativity, anyone can do it! In addition, this guide will walk you through the process of making a cake that’s both delicious and visually stunning. Moreover, whether you’re a beginner or a baking pro, you’ll find tips, tricks, and variations to make your cake as unique as the Pumpkin King himself.
Perfect for Any Occasion
Whether it’s Halloween, Christmas, or a themed birthday party, a Nightmare Before Christmas cake fits the mood perfectly. It seamlessly blends the spooky essence of Halloween with the festive charm of Christmas, making it a great choice for celebrations that bridge these two holidays. In addition, it’s the ultimate centerpiece for fans of Tim Burton’s classic movie, offering nostalgia and excitement for children and adults alike. Imagine presenting this cake at a party—it’s guaranteed to spark conversations and bring smiles to everyone’s faces.
Customizable and Fun
A Nightmare Before Christmas cake offers endless opportunities for creativity, making it as fun to decorate as it is to eat. You can craft simple, elegant designs like Jack Skellington’s iconic face or dive into more elaborate creations featuring scenes from Halloween Town. For instance, a cake with Sally’s patchwork dress design, complete with intricate fondant pieces, would be an instant hit. Moreover, you can add edible decorations like pumpkins, bats, or Spiral Hill to give your cake a unique twist. Whether you’re a beginner baker or a skilled decorator, this cake allows you to showcase your talents and explore new techniques, from fondant work to chocolate drips.
Crowd-Pleaser
Above all, a Nightmare Before Christmas cake is the perfect blend of art and flavor, making it an undeniable crowd-pleaser. Not only does it look stunning, but it also tastes delicious, ensuring that your guests enjoy every bite. Choose from classic flavors like vanilla or chocolate, or add a festive touch with red velvet or pumpkin spice. In addition, you can tailor the cake’s size and design to suit the occasion—whether it’s a small family gathering or a large holiday party. As a result, it’s a cake that doesn’t just feed the crowd but also leaves a lasting impression. A well-decorated Nightmare Before Christmas cake will undoubtedly become the highlight of your event, creating unforgettable memories for everyone involved.
Ingredients and Tools for Your Nightmare Before Christmas Cake
Before you begin, gather all the essentials to ensure smooth baking and decorating. In addition, preparing in advance will make the process easier and more enjoyable.
Ingredients:
the Cake:
- 2½ cups all-purpose flour
- 1 tsp baking powder
- ½ tsp baking soda
- 1 tsp salt
- 1 cup unsalted butter (softened)
- 1¾ cups granulated sugar
- 4 large eggs
- 2 tsp vanilla extract
- 1 cup buttermilk
- ½ cup cocoa powder (for a chocolate cake, optional)
the Buttercream Frosting:
- 1½ cups unsalted butter (softened)
- 4 cups powdered sugar
- 2 tsp vanilla extract
- 3–4 tbsp heavy cream or milk
- Black gel food coloring (for decorating)
- White gel food coloring (if needed)
Decorations:
- Fondant (white, black, red, and green for details)
- Edible food markers
- Black icing for piping
- Cake topper (optional)
Tools:
- 8-inch round cake pans (2–3 for layers)
- Parchment paper
- Stand mixer or hand mixer
- Rolling pin (for fondant)
- Piping bags and tips
- Offset spatula
- Fondant tools (cutters, shaping tools)
- Cake board or stand
Step-by-Step Instructions for Your Nightmare Before Christmas Cake
Here’s a detailed guide to create your Nightmare Before Christmas cake from scratch. Follow along to ensure success! Moreover, don’t rush the process, as each step builds on the last.
Bake the Cake
- Preheat the oven to 350°F (175°C). Line your round cake pans with parchment paper and grease them.
- In a medium bowl, whisk together flour, baking powder, baking soda, cocoa powder (optional), and salt.
- In a separate large bowl, beat the butter and sugar until light and fluffy.
- Add eggs one at a time, mixing well after each addition. Next, stir in vanilla extract.
- Alternate adding the dry ingredients and buttermilk to the wet mixture, starting and ending with dry ingredients. Consequently, this ensures a well-mixed batter.
- Divide the batter evenly into the prepared pans and smooth the tops.
- Bake for 25–30 minutes or until a toothpick inserted comes out clean.
- Finally, allow the cakes to cool completely before decorating.
Prepare the Buttercream Frosting for the Nightmare Before Christmas Cake
- Beat the butter on medium speed until creamy (2–3 minutes).
- Gradually add powdered sugar, mixing on low speed until fully incorporated. In addition, ensure there are no lumps.
- Stir in vanilla extract and heavy cream, adjusting consistency as needed.
- Reserve a portion of the frosting for details, and color the rest black using gel food coloring.
Assemble Your Nightmare Before Christmas Cake
- Level your cake layers with a serrated knife to ensure flat surfaces.
- Place the first layer on your cake board or stand.
- Spread an even layer of frosting, then stack the next cake layer. Similarly, repeat for all layers.
- Apply a thin crumb coat of black frosting to seal the crumbs. Chill for 20–30 minutes.
- Once chilled, apply the final layer of black frosting, smoothing it with an offset spatula.
Design Your Nightmare Before Christmas Cake
1: Jack Skellington Face
- Roll out white fondant and cut a large circle to fit the cake’s top. In addition, make sure it is smooth and even.
- Place the fondant on top of the black frosted cake.
- Use black fondant or icing to create Jack’s eyes, nose, and iconic stitched smile. Similarly, secure the details onto the white fondant.
2: Full Halloween Town Scene
- Roll out black fondant to create spooky silhouettes: Jack, Sally, Spiral Hill, and pumpkins. For instance, Spiral Hill makes a fantastic focal point.
- Attach the silhouettes to the cake’s sides using frosting as glue. Moreover, add green and red fondant for accents, such as Zero’s glowing nose or Christmas decorations.
3: Tiered Nightmare Before Christmas Cake
- Bake and stack 2–3 layers per tier, creating a tiered effect. In contrast, this option works well for larger celebrations.
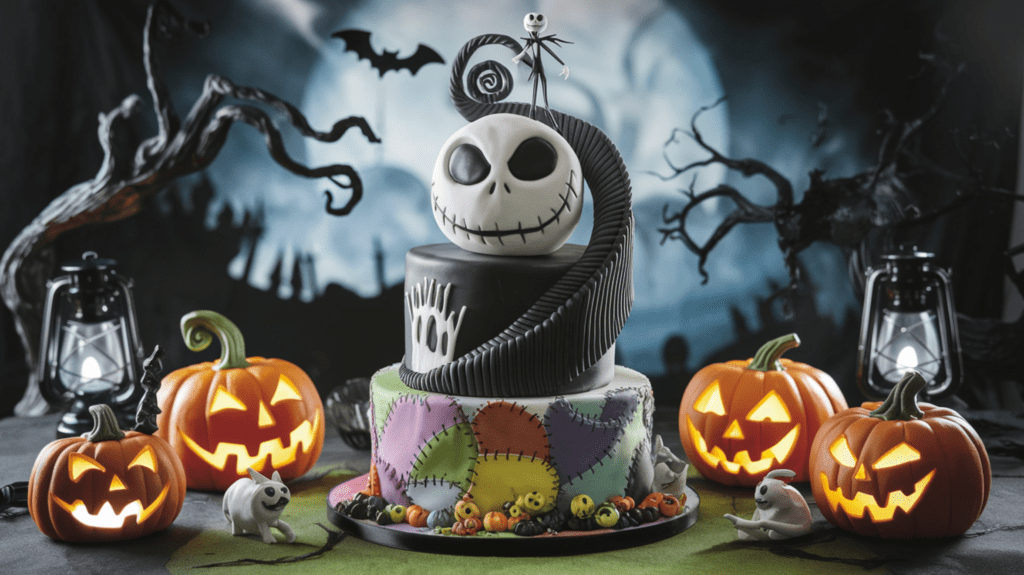
- Decorate each tier differently – one featuring Jack’s face, another showcasing Sally’s patchwork dress, and the top with Spiral Hill.
- Additionally, add finishing touches with edible glitter or a themed topper.
Creative Variations for Your Nightmare Before Christmas Cake
Here are a few unique ways to customize your Nightmare Before Christmas cake and make it truly stand out:
Glow-in-the-Dark Cake
Take your cake to the next level with a glow-in-the-dark effect. Use edible glow-in-the-dark paint or food-safe UV-reactive gel to highlight Jack Skellington’s face, Spiral Hill, or other eerie elements like ghosts and pumpkins. Above all, this variation is perfect for nighttime parties or dimly lit events where the glowing decorations will make your cake the centerpiece of the celebration. Additionally, you can complement the effect with glow-in-the-dark cupcake toppers or glowing frosting accents for a spooky ambiance.
Pumpkin Spice Flavor
Embrace the festive autumn vibe by infusing your cake batter with cozy pumpkin spice flavors. Add a mix of cinnamon, nutmeg, cloves, and a hint of ginger to your batter for a rich, seasonal taste. Not only does this give your Nightmare Before Christmas cake a unique flavor, but it also ties perfectly into the Halloween theme. For added flair, consider layering the cake with cream cheese frosting or spiced buttercream to enhance the warm, aromatic notes. In short, this is the ultimate cake for fall lovers.
Red Velvet Base
A red velvet cake adds an elegant yet spooky twist to your design. The deep red hue contrasts beautifully with black frosting, making the cake visually stunning and festive. Moreover, red velvet’s subtle cocoa flavor pairs well with vanilla and cream cheese frosting. Decorate the cake with Jack Skellington’s face or silhouettes of Halloween Town—the vibrant red color underneath will add a dramatic “wow” effect when you slice into it. As a result, this variation is both stylish and delicious.
Sally’s Patchwork Design
Pay homage to Sally’s iconic dress by covering the cake with colorful fondant pieces arranged in a patchwork design. Use vibrant colors like red, blue, yellow, and black to recreate her stitched-together appearance. Add edible stitching details using black icing or edible food markers to bring the design to life. For a finishing touch, you can incorporate elements like fondant buttons or small flowers inspired by Sally’s character. This variation is visually stunning and will appeal to fans of Sally’s unique charm.
Chocolate Drip Effect
Add a touch of elegance and drama to your Nightmare Before Christmas cake with a chocolate drip effect. Use black or white melted chocolate and carefully drip it around the edges of the cake for a polished finish. Not only does this create a visually appealing design, but it also adds a rich, indulgent flavor. In addition, you can enhance the look with spooky details like fondant bats, edible pearls, or tiny pumpkins placed strategically along the drip. For instance, combining a chocolate drip with Jack Skellington’s face creates an eerie and sophisticated cake.
Marble Cake Effect
For an added layer of creativity, consider a black-and-white marble cake base to represent the movie’s iconic black-and-white aesthetic. Swirl black cocoa and vanilla batters together for a striking visual effect when slicing cake. Additionally, decorate the exterior with Jack Skellington’s face or Spiral Hill to keep the theme cohesive. In short, this variation is both delicious and visually dynamic, perfect for any Nightmare Before Christmas fan.
FAQs About The Nightmare Before Christmas Cake
1. How do I make a Nightmare Before Christmas cake for beginners?
Start with a simple design like Jack Skellington’s face using black and white fondant. Focusing on clean lines and basic shapes ensures success. For a detailed step-by-step guide, click here.
2. Where can I buy a Nightmare Before Christmas cake?
Many local bakeries or online cake decorators offer custom cakes inspired by the movie. For example, websites like Etsy also feature handmade designs. If you want more information on where to purchase one, click here.
3. Why didn’t Tim Burton direct The Nightmare Before Christmas?
While Tim Burton created the story and characters, Henry Selick directed the film. However, Burton was busy with other projects at the time. For a deeper dive into why Tim Burton didn’t direct, click here.
4. What does The Nightmare Before Christmas Sally perfume smell like?
Inspired by Sally’s character, the perfume typically has floral, earthy, and slightly sweet notes reminiscent of nature. To learn more about the unique scent inspired by Sally, click here.
For additional tips, guides, and creative ideas for your cake, visit our complete resource on the Nightmare Before Christmas cake here. If you’re interested in even more themed cake options, click here.
Conclusion
In conclusion, creating a Nightmare Before Christmas cake perfectly celebrates Tim Burton’s iconic film and showcases your baking skills. Moreover, whether you choose Jack Skellington’s simple face, a multi-tiered masterpiece, or a glow-in-the-dark wonder, this cake will impress at any Halloween, Christmas, or themed party.
If you want more inspiration or tools to make your dream cake a reality, check out these resources:
- Learn more about themed cakes on Delish
- Get creative cake ideas from Wilton
- Find high-quality baking tools on Sur La Table
Combining creativity, flavor, and a touch of Halloween Town magic, your Nightmare Before Christmas cake will become the highlight of any celebration. Happy baking!
Chocolate Guinness Cake with Baileys Buttercream
Ultimate Dolly Parton Butterscotch Pie: 5 Sweet Reasons to Try This Classic Dessert
5-Minute Sausage Egg and Cheese Breakfast Roll-Ups: The Perfect Morning Delight
Healthy Avocado Grilled Cheese: 5 Reasons to Try This Nutritious Twist on a Classic
7 Reasons to Love Smothered Potatoes: A Delicious and Nutritious Comfort Food
Greek Yogurt Chia Pudding: 5 Reasons This Simple, Healthy Treat is a Game-Changer

